Importing MDG
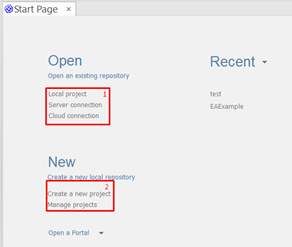
In order to install the desired MDG technology, open your model in the project browser (1) or create a new project (2) in the Enterprise Architect.
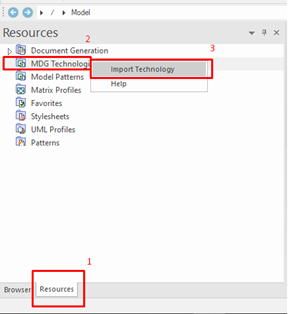
Next, open the resources view either by navigating to the Resources tab (1) or by clicking Alt+6 (1) which will open the tab.
In the resources box right-click on MDG Technologies (2) and select Import Technology (3).
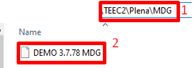
From the subdirectory MDG of the Plena installation directory (1) select the technology, DEMO X.X.XX MDG (2) file.
Lastly, there is a choice of importing the MDG to the model (1) or to the user (2).
When installed in the model, the new versions of this technology can be chosen to be applied to the existing repositories. When installed to the user, all models will use this version of the technology. (This is not recommended for Plena)
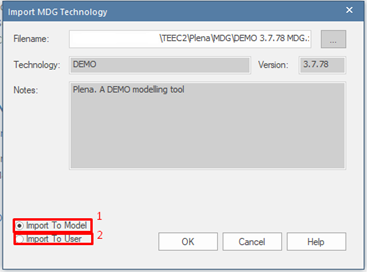
Bear in mind the fact that if MDG is imported to the model and not to the user the step of importing an MDG will have to be repeated for each subsequent model.
Plena tool startup
In order to access the Plena tool from within the EA, the user must navigate to the Specialize tab (1), press the Plena icon (2) and start it in Docked Mode (3). If the Plena Add-In window does not appear automatically, please proceed and click on the Windows button (4).

License
For a description of how to activate the license for first-time users or make use of an existing licence on a new machine please refer to https://plena.teec2.nl/license/.
Configuration file (This is optional and only for extended licenses)
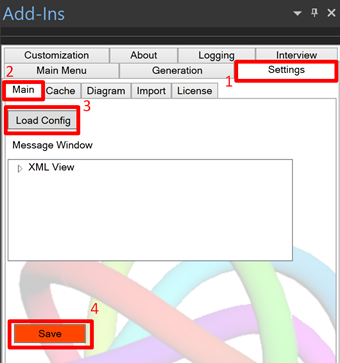
In order to load a configuration file, the user must navigate to the Settings of Plena (1), select Main tab (2) within the Settings and then click on Load Config button (3). After the user has selected the desired configuration file, he/she must Save (4) it in the settings.
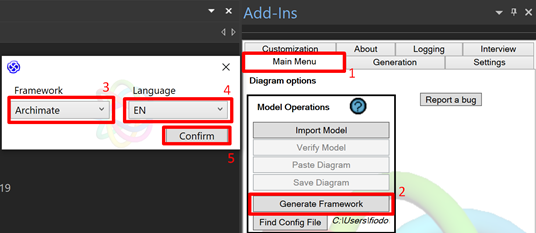
The configuration file allows for the loading of various, user-configurable, frameworks to the EA. For instance, it is possible to create a folder structure for the saving of all ArchiMate related elements in the designated folders. Users can generate the desired framework by navigating to Main Menu (1) within Plena and selecting Generate Framework (2). In the pop-up window, the user is then able to choose the desired framework (3) and its language (4) from a drop-down menu and then confirm (5) this choice.
First view and DEMO diagram
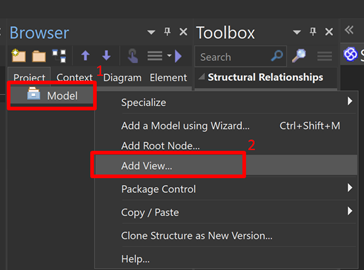
In order to start using the Plena tool, the user must create a view in the newly created project by right-clicking on a model (1) and selecting Add View… (2) or make sure that such a view is available in the existing project.
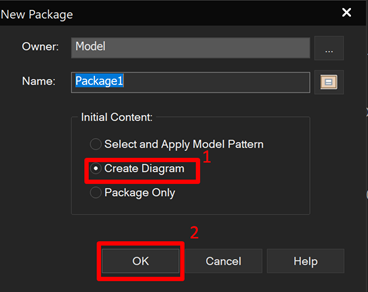
Next, the user is presented with the three possible Initial Content options. It is advised to proceed with selecting Create Diagram (1) and pressing OK (2). In case a more sophisticated folder structure is desired, the Package Only option can be chosen.
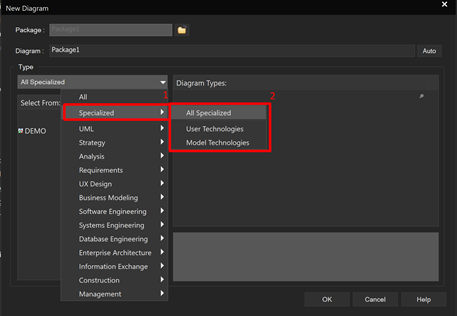
After having selected the initial content of the new package, the user can choose the appropriate perspective from All Perspectives (1). By scrolling all the way down (2) in All Perspectives, Demo (3) perspective can be chosen. After that, the desired Diagram type can be selected (4).

The user might be wondering why when browsing through all Perspective sets (1) Demo perspective is not visible from the Enterprise Architecture Perspective Set (2, 3).
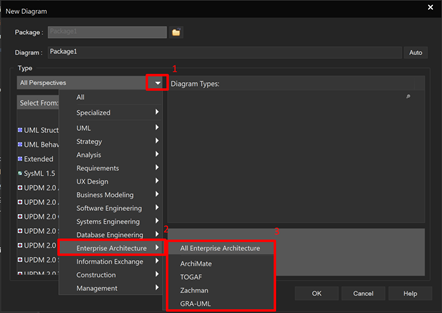
The answer to this question is quite straightforward. As discussed in the Importing MDG section, the user manually imports and MDG technology. As a result of this action, an MDG technology is imported into Specialized Perspective Set (1,2).